What to Do if Your Bicycle Schrader Valve Is Leaking
Introduction
\Today, we’re here to tackle a common issue that many of us have faced while enjoying our bike rides – a leaking Schrader valve on your bicycle. Imagine this: you’re cruising along, the wind in your hair, and suddenly, you hear that annoying hissing sound.

Or, even worse, your tire goes completely flat. It can be frustrating but don’t fret because I’m here to lend a helping hand.
In this guide, we’ll delve into everything you need to know about what to do if your bicycle Schrader valve is leaking and, most importantly, how to fix it when it starts leaking.
Understanding Schrader Valves
Before we dive into solving the pesky issue of a leaking Schrader valve, let’s take a closer look at what these little valve buddies are. Picture this: Schrader valves are like the regular folks in the bike valves. They’re not fancy or complicated, just good ol’ dependable valves that help you keep your tires inflated.
You’ve probably seen them on your car tires, and guess what? They look the same on your bike’s inner tubes!
Yes, that’s right, they’re the most common type of valve you’ll find on your bicycle, and they’re as familiar as the air pump at a gas station. That round, metal thing that you attach your pump to? That’s the Schrader valve.
But why is it important to know this? Well, because understanding what a Schrader valve is will make it easier for you to recognize and solve any issues. You see, these valves work like gatekeepers, allowing air to flow in and out of your tire.
So, when they start acting up, it’s crucial to know what’s going on. Now that we’ve got that covered, let’s move on to recognizing the signs of a leaky Schrader valve.
Identifying the Signs of a Leaky Schrader Valve
Let’s take a closer look at how to spot a Schrader valve that’s up to no good. It’s like finding clues in a mystery story, but we’ll make it simple, I promise!
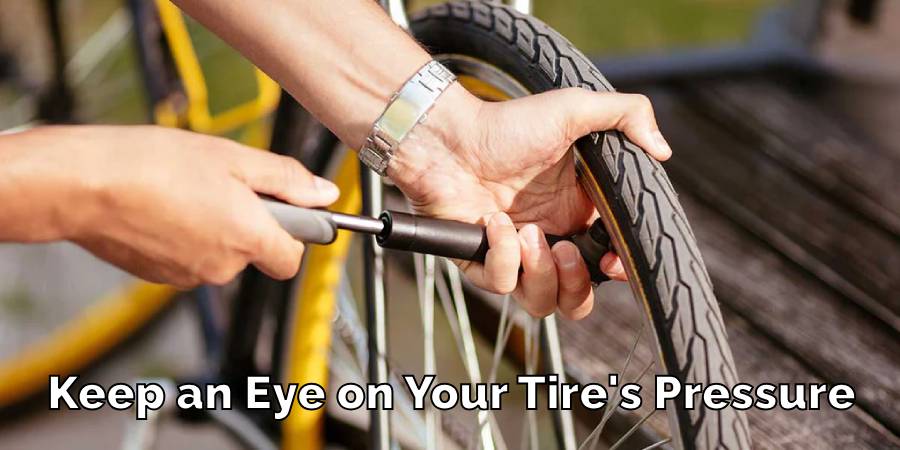
- Step 1: Keep an eye on your tire’s pressure. When you notice it gradually losing air, it’s like your tire is slowly saying goodbye to its air, just like a balloon losing its puff. That’s a telltale sign of a leaking Schrader valve.
- Step 2: Give the valve a gentle press. If you hear a hissing sound, it’s like your tire is whispering a secret – it’s got a leak. It’s your bike’s way of saying, “Hey, we’ve got a problem here!
- Step 3: Grab some soapy water and generously apply it around the valve area.
- Step 4: Watch closely. If you see tiny bubbles forming, it’s like your tire is blowing bubblegum bubbles – kind of cute, right? But not when it’s your tire. Those bubbles mean that air is escaping, and your Schrader valve is the culprit.
If you’ve spotted any of these signs, it’s time to roll up your sleeves, gather your tools, and let’s dive into fixing that pesky leaky Schrader valve!
Causes of Schrader Valve Leaks
Let’s dig into the common culprits causing this and how you can prevent them:
- Dirt and Debris: Imagine your Schrader valve as a tiny gateway for air. If dirt, dust, or debris finds its way in, it can interfere with the valve’s sealing mechanism. Keep your valve area clean to avoid this issue.
- Valve Core Damage: The valve core is the heart of your Schrader valve. It can get damaged over time due to wear and tear or over-tightening. A damaged core won’t seal properly, leading to leaks.
- Age and Wear: Just like anything else, Schrader valves can show signs of aging. Over time, the rubber gasket inside the valve can deteriorate, causing leaks. Replacing old valves periodically is a wise move.
- Valve Cap Neglect: That little cap on your Schrader valve might seem insignificant, but it plays a vital role in keeping dirt and moisture out. Neglecting to use a valve cap can lead to valve damage and eventual leaks.
- Puncture Damage: Sometimes, sharp objects on the road can puncture your inner tube, causing the Schrader valve to leak. Ensure your tires are in good condition and avoid debris-ridden paths.
- Valve Stem Length: Using a valve stem that is too long for your rim can put pressure on the valve, causing it to bend or even break, resulting in leaks.
- Inadequate Tightening: If you’re not careful while attaching your pump to the valve, you may inadvertently loosen or damage the valve core, leading to leaks. Always be gentle when securing your pump.
- Corrosion: Over time, exposure to the elements can cause corrosion on the valve, compromising its integrity. Regularly inspect your valve for signs of rust.
By understanding these causes, you’ll be better equipped to prevent Schrader valve leaks in the future. It’s all about taking proactive measures to keep your bike riding smoothly and your tires properly inflated.
What to Do if Your Bicycle Schrader Valve Is Leaking
Alright, so your Schrader valve is acting up, and you’ve got that annoying hissing sound or a flat tire on your hands. No need to worry we’ve got your back. Fixing a leaky Schrader valve is doable, and I’m here to guide you through it step by step.
Step 1: Gather Your Tools
First things first, let’s make sure you’ve got everything you need. You’ll want to have an adjustable wrench, a Schrader valve tool (or a small Schrader valve core remover tool), a replacement valve core (just in case), and a pump handy. Having these tools within reach will save you some hassle later on.
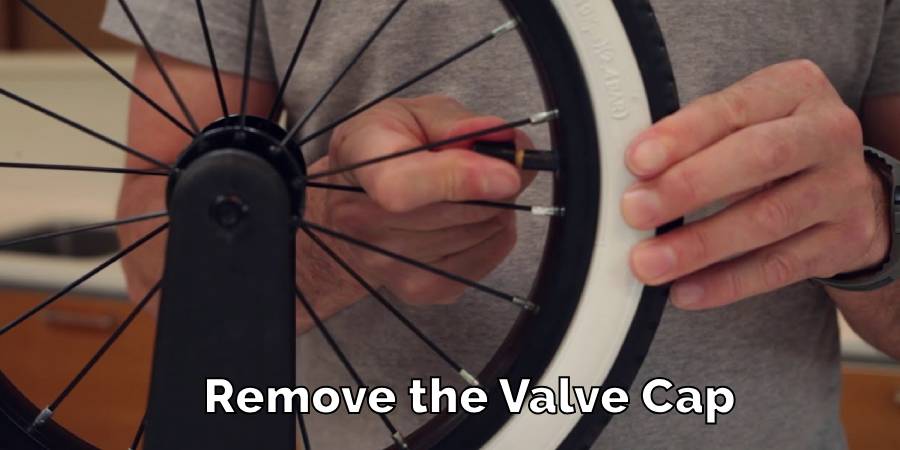
Step 2: Remove the Valve Cap
Start by taking off the little cap on your Schrader valve. That cap may seem tiny, but it plays a big role in keeping dirt and moisture out of your valve.
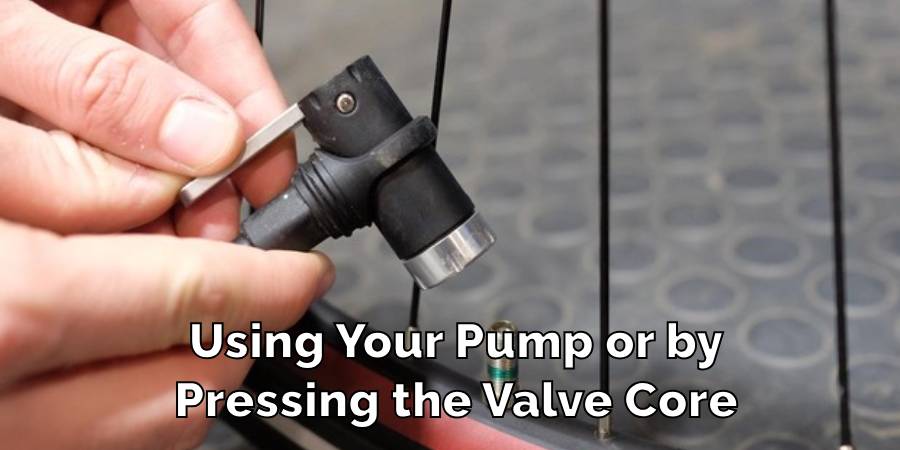
Step 3: Deflate the Tire
Using your pump or by pressing the valve core, gently release all the remaining air from your tire. This step is essential to prevent any surprises when you start working on the valve.
Step 4: Unscrew the Valve Core
Now, use your adjustable wrench or the Schrader valve tool to carefully unscrew the valve core counterclockwise. Be gentle, so you don’t damage the valve stem. If the valve core is damaged or looks worn out, it’s a good idea to replace it with the spare one you brought along.

Step 5: Inspect and Clean
Take a close look at the valve and its surroundings. Make sure there’s no debris or gunk stuck around the valve area. If you spot any dirt or foreign particles, clean them off with a soft cloth or a cotton swab.
Step 6: Replace or Reinstall the Valve Core
If you had to replace the valve core, screw in the new one clockwise until it’s snug. If you’re reusing the same valve core, screw it back in gently but firmly.
Step 7: Inflate the Tire
Now, it’s time to pump up your tire to the recommended pressure. Check the sidewall of your tire for the proper PSI (pounds per square inch) rating and use your pump to reach that level.
Step 8: Replace the Valve Cap
Don’t forget to put that little cap back on your Schrader valve. It may be small, but it does a big job of keeping your valve clean and trouble-free.
Step 9: Check for Leaks
Before you hit the road again, take a moment to check for any hissing sounds or signs of air escaping around the valve area. If everything seems quiet and stable, you’re good to go!
By following these steps, you can quickly fix that leaky Schrader valve and get back to enjoying your bike ride without any worries. Happy cycling!
Precautions While Repairing
When you’re fixing a Schrader valve leak, it’s not about being a pro mechanic, but it’s still essential to be safe. Here are some simple safety tips to keep you out of harm’s way:
- Safety First: Before anything else, make sure your bike is in a safe place. Find a flat, stable surface to work on, away from traffic or any hazards.
- Deflate the Tire: Always start by letting the air out of the tire completely. This step ensures your safety by preventing sudden pops or surprises while working on the valve.
- Use Caution with Tools: When using tools like an adjustable wrench or a valve core tool, be gentle but firm. Over-tightening can damage the valve, and we want to avoid that.
- Don’t Rush: Take your time. Rushing can lead to mistakes. Slow and steady wins the race when it comes to bike repairs.
- Clean the Area: Make sure the valve area is clean and free from dirt or debris. A clean workspace helps prevent contamination and damage to the valve.
- Check for Leaks: After you’ve fixed the valve, check for leaks by listening for hissing sounds or applying soapy water around the valve area. It’s your final safety check before hitting the road.
- Proper Inflation: When inflating your tire, ensure you don’t overinflate it. Follow the PSI recommendations on the tire’s sidewall for the right pressure.
- Replace Damaged Parts: If you notice any damaged parts while repairing, like a worn-out valve core, don’t hesitate to replace them. Safety always comes first.
By following these simple precautions, you’ll not only fix that pesky Schrader valve but also ensure that you stay safe throughout the process. It’s all about having a worry-free and enjoyable biking experience!
FAQ’s
Can You Put Sealant in a Schrader Valve?
Absolutely! Adding sealant to a Schrader valve can be a smart move. Sealant helps prevent and repair punctures by sealing small holes as they occur. Here’s how you can do it correctly:
- First, remove the valve cap and valve core using an appropriate tool.
- Next, using a sealant injector or a tube, carefully insert the sealant into the valve stem.
- Reinstall the valve core and cap, making sure they’re snug.
- Give your tire a good spin to distribute the sealant evenly.
- Inflate your tire to the recommended pressure.
- Sealant can be a real lifesaver on the road, as it can seal small punctures instantly, keeping your ride smooth.
Can a Leaky Valve Be Repaired?
Most definitely! Leaky Schrader valves can often be repaired. However, whether it’s worth repairing or replacing the valve depends on the extent of the damage. Here are some insights to help you decide:
- If the valve core is damaged or worn, you can replace it easily with a new one.
- If the valve stem is corroded or severely bent, it’s usually best to replace the entire Schrader valve.
- Minor leaks around the valve base can often be fixed with proper cleaning and reseating of the valve.
- Remember, regular maintenance and timely repairs can extend the life of your Schrader valve, saving you time and money in the long run.
What’s Inside a Schrader Valve?
Schrader valves may seem like tiny mysteries, but they’re not that complicated on the inside. Let’s take a peek:
- The main components include a valve core, a rubber gasket, and a spring.
- The valve core is like the gatekeeper, controlling the flow of air.
- The rubber gasket provides an airtight seal when the valve is closed.
- The spring ensures the valve opens and closes properly.
- It’s a simple setup, but these components work together to keep your tire inflated.
Can You Over-tighten a Schrader Valve?
Yes, you can, and it’s essential to be gentle when tightening a Schrader valve. Over-tightening can lead to damaging the valve core or stem, which can cause leaks.
To avoid this, use an adjustable wrench or a valve core tool and tighten it snugly but not excessively. A little care goes a long way in keeping your valve in good shape.
Is a Valve Leak Serious?
While a valve leak may not seem like a big deal at first, neglecting it can lead to significant issues. A leaking Schrader valve can result in gradual tire deflation, affecting your bike’s performance and safety.
Riding on underinflated tires can lead to reduced control, increased rolling resistance, and even tire damage. It’s always a good idea to address a valve leak promptly to ensure a smooth and safe riding experience.
Conclusion
When you come across a pesky leaking Schrader valve, don’t let it spoil your biking fun. Armed with the knowledge and steps we’ve covered here, you’re well-prepared to tackle the issue with confidence.
Always remember that your bike’s valves, though small, play a crucial role in ensuring your ride is enjoyable and trouble-free. Taking good care of them is like giving your bike a little extra love. This article has answered what to do if your bicycle Schrader valve is leaking.
So, the next time you hear that telltale hissing sound or sense your tire losing pressure, don’t get flustered.
Instead, calmly follow the steps we’ve outlined, resolve the problem, and get back to the sheer joy of pedaling. Your bike will thank you, and you’ll continue to relish those wonderful cycling adventures. Happy cycling, folks!